This routine doesn’t require any equipment or standing and can be completed in 10 minutes.
As a CLT-LANA and oncology physical therapist, I designed this sequence as part of my collaboration with Lymphie Strong with the intention of helping people at different stages of recovery. Whether you are a few weeks post breast cancer surgery or several years out from treatment, these stretches are a safe place to start.
This full-body stretching flow moves from the top of the body down. You’ll hold each stretch for 20 seconds with a 10-second rest between. I’ll walk you through modifications as we go.
If you are not ready for floor work, I have a seated version coming. If you are looking for something more targeted after breast cancer surgery, check out my post on shoulder exercises for breast cancer recovery.
Why a Full Body Stretching Routine Matters for Cancer Recovery
Cancer treatment is hard on the body. Surgery, radiation, and chemotherapy all affect how your muscles, fascia, and lymphatic system move. Stretching helps address several of those side effects at once.
Gentle movement helps pump lymph fluid through the lymphatic vessels. When muscles contract and release during stretching, they create pressure changes that push fluid toward the lymph nodes. Regular gentle stretching can reduce local connective tissue inflammation, which is relevant for anyone managing fibrosis or tightness after surgery or radiation.
A randomized clinical trial on early exercise after breast cancer surgery found that tailored stretching programs begun within days of surgery improved shoulder range of motion at both one and six months. Starting early and staying consistent matters.
A review of clinical trials in breast cancer patients found that starting a gradual exercise program, including strength training, does not increase the risk of lymphedema. In some cases, it may even lower the chance of developing it compared with restricting arm use. Overall, movement-based rehabilitation appears to be safe and may be helpful.
This routine also supports range of motion in the chest, shoulders, hips, and spine. Those are all areas that tighten after treatment. See my post on lymphatic drainage exercises for more on how movement and the lymphatic system work together.
Before You Start: Safety Guidelines for Stretching with Lymphedema
Please speak with your doctor or physical therapist before beginning any new exercise routine, especially if you are currently in treatment or recently post-surgery.
- Use a mat or folded blanket under your knees if the floor is uncomfortable.
- Aim for a light to moderate stretch only. You should feel a gentle pull, not pain.
- If something increases swelling, tightness, or pain, stop and rest.
- Breathe through each stretch. Do not hold your breath.
- Each stretch is held for 20 seconds with 10 seconds of rest between.
If you have active lymphedema, wear your compression garment during exercise unless your CLT has told you otherwise.
Questions about compression? I made a YouTube video explaining how to pick a compression stocking or garment. You can check it out here.
Follow-Along: 10-Minute Full Body Floor Stretching Routine
Watch the full routine below, or read through each stretch with step-by-step instructions.
1. Neck Rotation
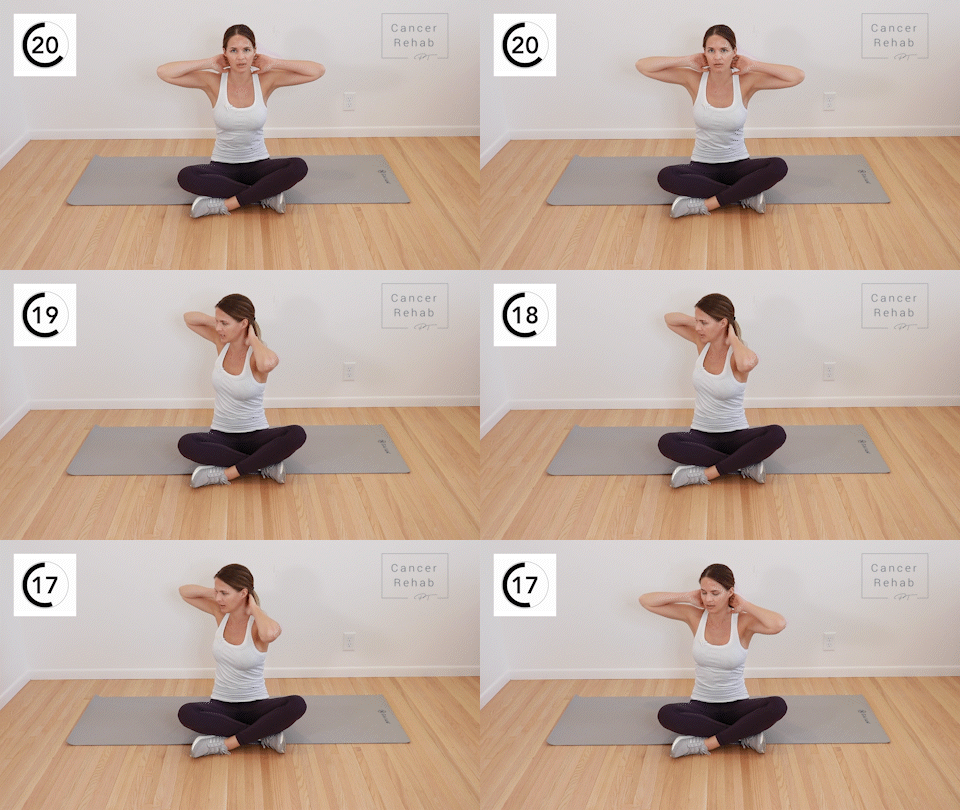
How to do it:
- Tuck your chin gently down.
- Roll one ear toward your shoulder.
- Slowly roll back through center and over to the other side.
- Continue side to side for 20 seconds, moving gently.
Why it works:
The neck muscles tighten with stress and poor posture. This movement gets circulation going and loosens the cervical spine before deeper stretches.
2. Upper Trapezius Stretch
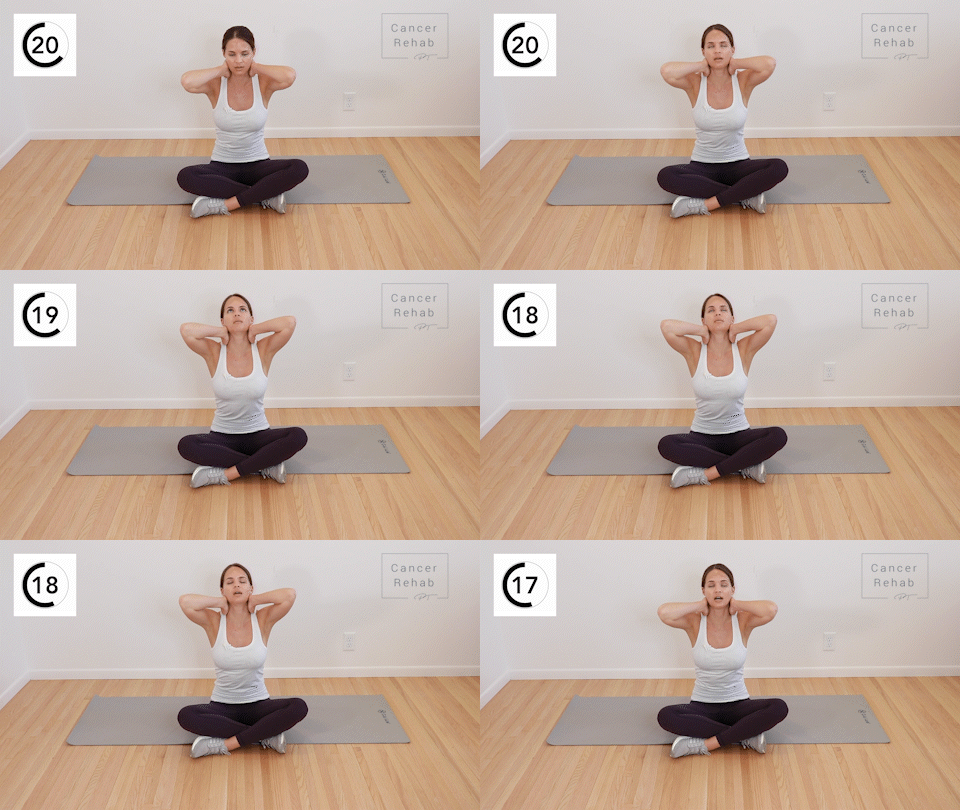
How to do it:
- Tilt one ear toward your shoulder.
- Look slightly down.
- For a deeper stretch: place the same-side hand across to the opposite shoulder and gently press down, or place your hand on top of your head and apply light pressure.
- Hold 20 seconds, then switch sides.
Why it works:
The upper trap is one of the most common places people hold tension, especially after surgery or during treatment when posture shifts. This stretch targets that area directly.
3. Side-Lying Chest Opener
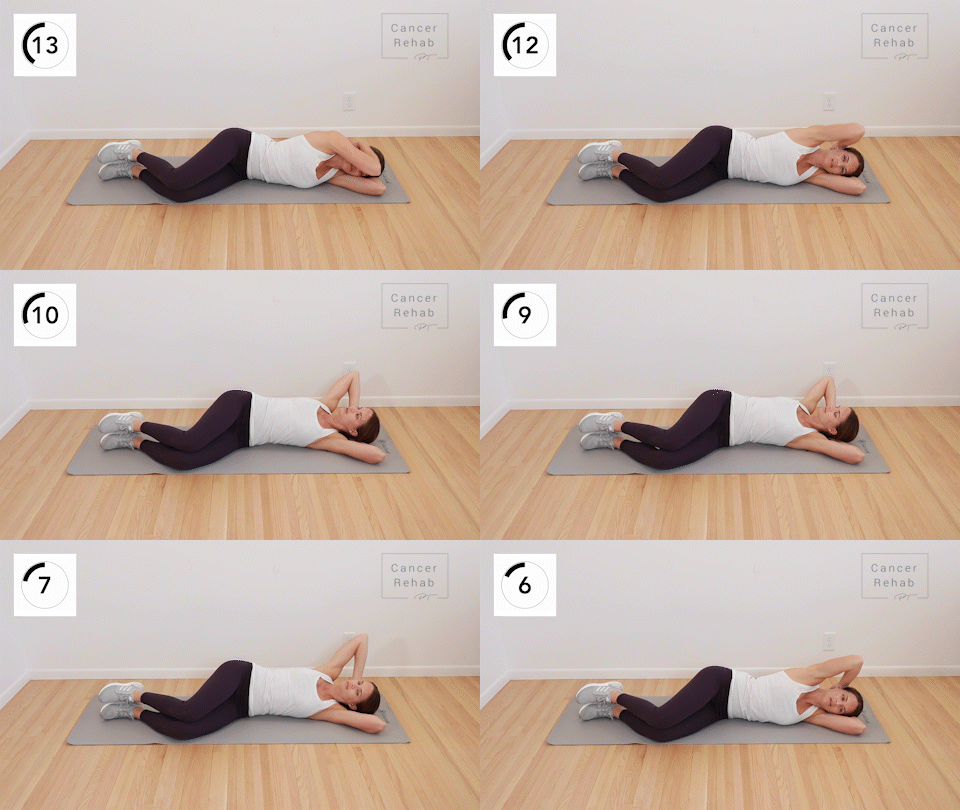
How to do it:
- Lie on your side with your knees slightly bent.
- Place your top hand behind your head.
- Gently rotate your top elbow open toward the ceiling and back until you feel a stretch across the chest.
- Take a deep breath in, and as you exhale, sink a little further into the stretch.
- Hold 20 seconds, then switch sides.
Why it works:
Tightness across the chest and axilla (armpit) is common after breast surgery and radiation. This stretch opens the pectorals and anterior shoulder without putting stress on the arm. If you had a mastectomy or reconstruction, stay within your surgeon’s range of motion guidelines.
4. Side-Lying Shoulder Circle
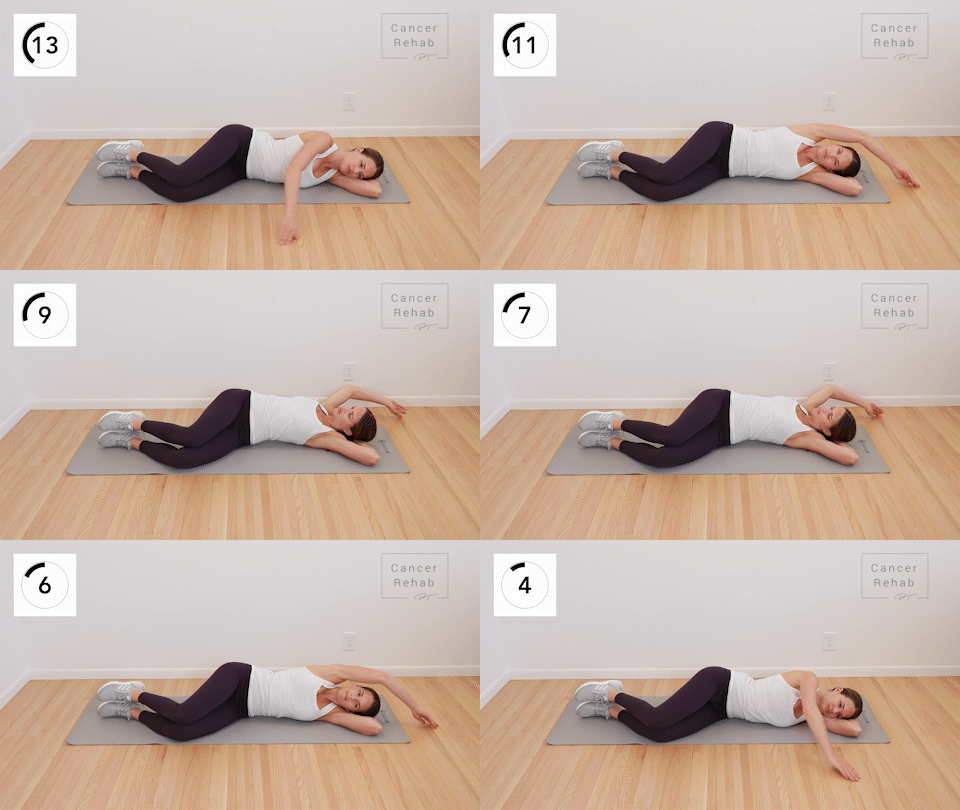
How to do it:
- Stay on the same side.
- Extend your arm out in front of you along the floor.
- Make as large a circle as you can, sweeping the hand up, over your head, and around behind you.
- Keep your hand as close to the floor as possible through the motion.
- Complete 3 to 4 full circles in 20 seconds, then switch sides.
Why it works:
This movement takes the shoulder through its full available range. After breast cancer treatment, the shoulder often loses mobility from scar tissue, cording (axillary web syndrome), or compensating postures. Working through the full range gently helps prevent further restriction.
5. Supine Trunk Rotation
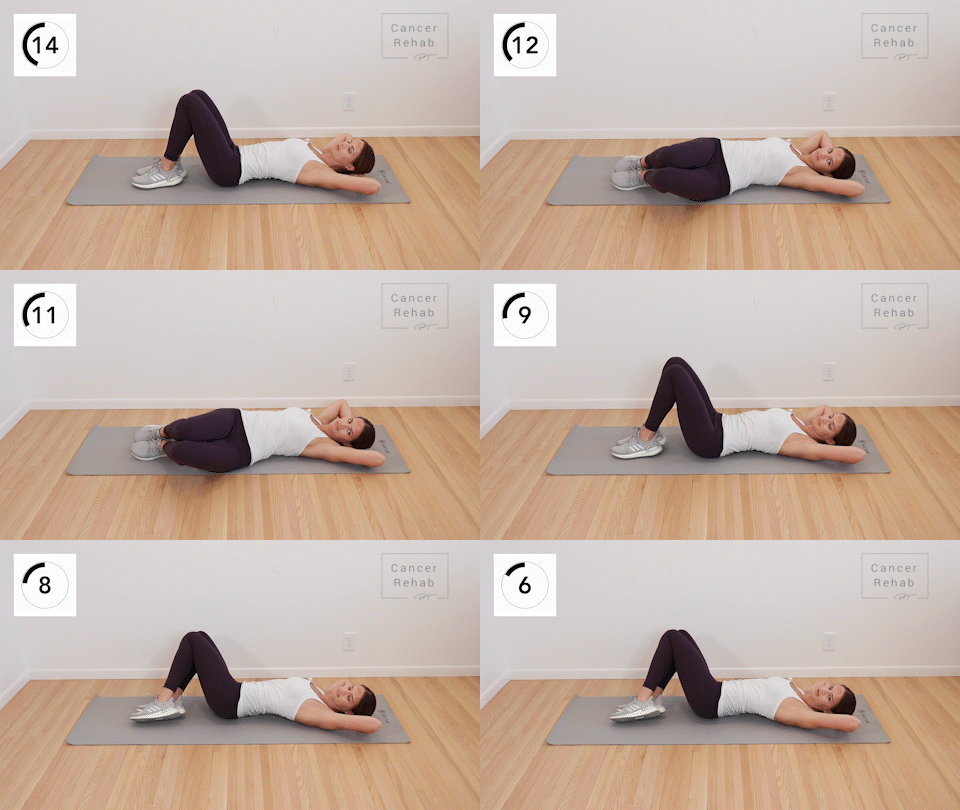
How to do it:
- Lie on your back with knees bent and feet flat on the floor.
- Place your hands lightly behind your head.
- Let both knees fall slowly to one side.
- Hold for 20 seconds while taking slow breaths.
- Bring knees back to center, then lower to the other side.
Why it works:
This stretch moves the thoracic and lumbar spine into rotation. It also opens the chest and rib cage, which supports lymphatic flow from the torso. Most people feel this in the side, back, or across the chest, depending on where they are tightest.
6. Press-Up (Prone Extension)
[GIF: Prone press-up or elbows]
How to do it:
- Lie on your stomach.
- Place your hands under your shoulders.
- Press up as far as comfortable. Some people will only reach their elbows. That is fine.
- Try to let your lower back relax rather than tightening it.
- Hold for 20 seconds.
Why it works:
This extension stretch opens the front of the spine and hip flexors. After extended time sitting or lying during recovery, the lumbar spine often loses its natural curve. This is a gentle way to restore it. Do not push through pain.
7. Child’s Pose with Side Reach
[GIF: Child’s pose side reach]
How to do it:
- Come up onto your hands and knees.
- Sit your hips back toward your heels in a modified child’s pose.
- Walk your hands over to the right until you feel a stretch along your left side.
- Take a deep breath in and let it expand your rib cage.
- Hold 20 seconds, then walk hands to the left side and repeat.
Why it works:
This stretch targets the lateral trunk, which often gets stiff after surgery on one side of the chest. The breathing component also helps move lymph fluid through the thoracic duct.
8. Half-Kneeling Hip Flexor Stretch
[GIF: Half-kneeling hip flexor stretch]
How to do it:
- Kneel on one knee with the other foot in front.
- Pad the kneeling knee with a folded towel if needed.
- Keep your back flat and pelvis tucked slightly under.
- Gently lean forward until you feel a stretch in the front of the hip on the kneeling side.
- Hold 20 seconds, then switch sides.
Why it works:
The hip flexors shorten with prolonged rest. Tight hip flexors pull the pelvis forward and affect posture all the way up the spine. This stretch addresses that without putting stress on the knee or back.
9. Supine Knee to Chest
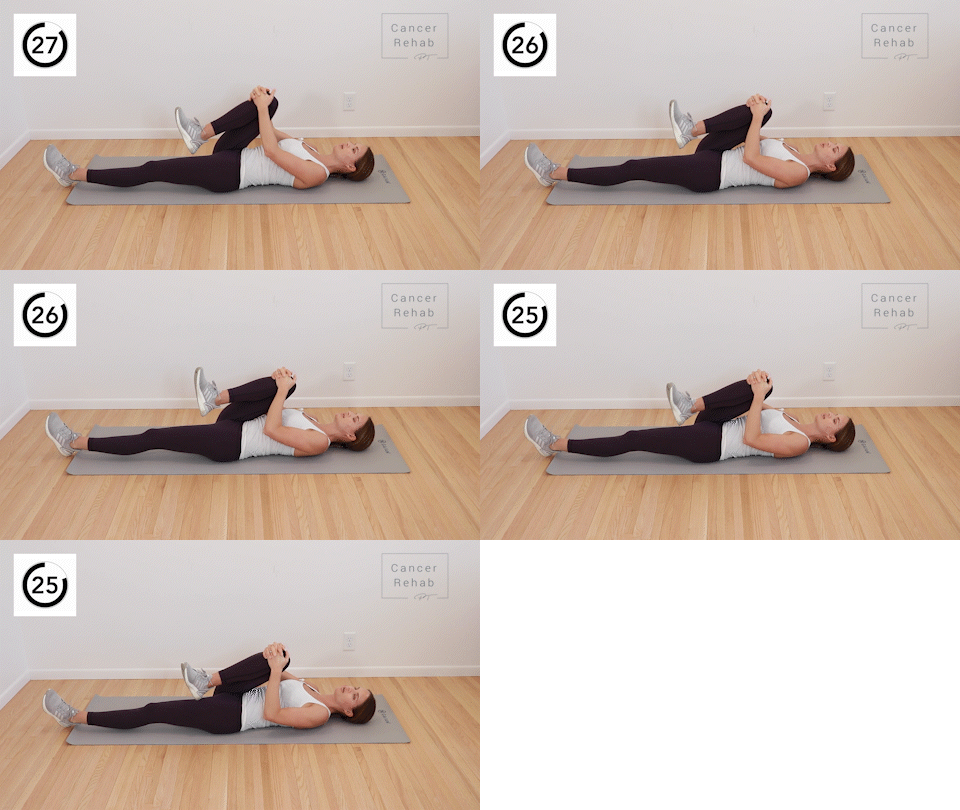
How to do it:
- Lie on your back. The opposite leg can be straight or slightly bent.
- Pull one knee toward your chest, holding in front of the knee or behind it if you have knee sensitivity.
- Hold for 20 seconds.
- Switch sides.
Why it works:
This stretch opens the low back and hip. It also applies gentle traction to the lumbar spine. If you feel it in your back, try bending the resting leg to keep your spine flat.
10. Figure-4 Hip Stretch
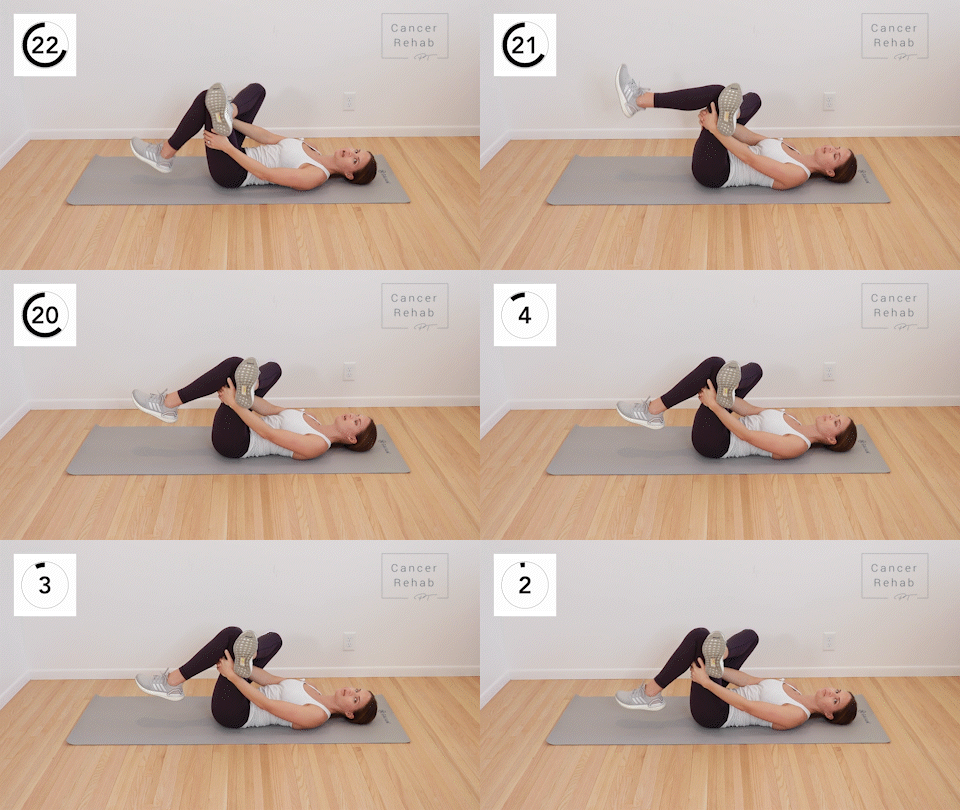
How to do it:
- Lie on your back with knees bent.
- Cross one ankle over the opposite knee.
- Flex the crossed foot to protect the knee.
- If needed, this position alone creates the stretch. For more, grasp behind the lower thigh and draw the leg toward your chest.
- Hold 20 seconds, then switch sides.
Why it works:
This stretch targets the piriformis and external hip rotators. These muscles often tighten during recovery when walking and daily movement are reduced.
11. Supine Hamstring Stretch
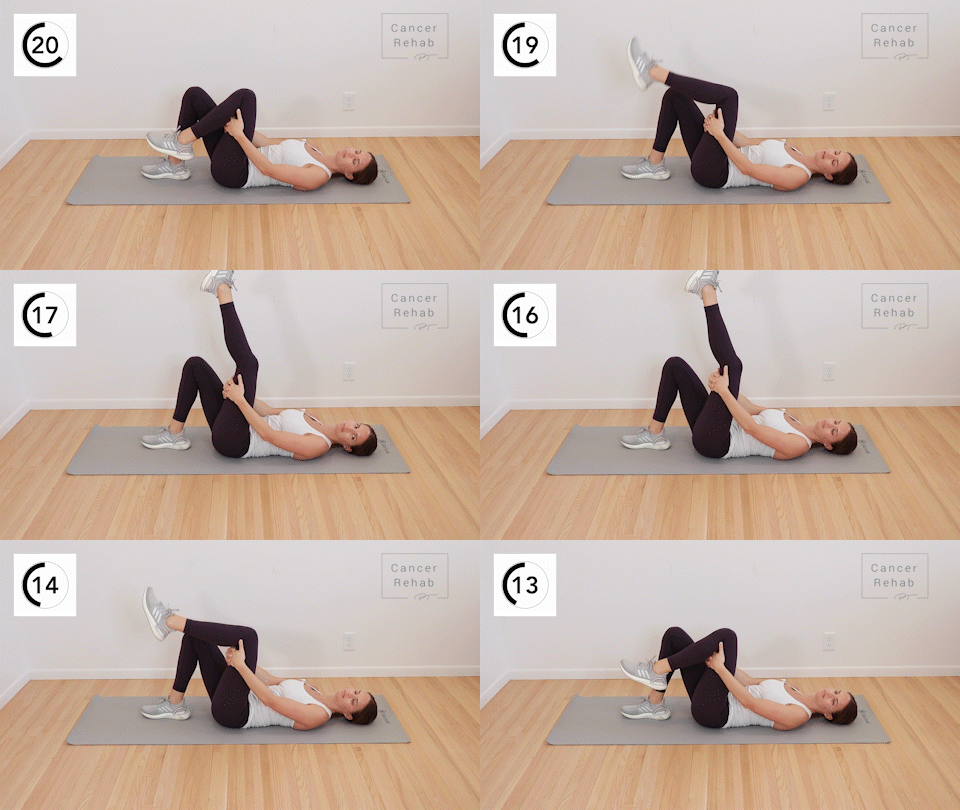
How to do it:
- Lie on your back. Bring one knee up to about 90 degrees.
- Hold behind the knee and slowly straighten your leg toward the ceiling.
- For more stretch, gently flex your ankle, pulling your toes toward you.
- You can alternate bending and straightening the ankle for nerve flossing.
- Hold for 20 seconds, then switch sides.
Why it works:
The hamstrings connect to the pelvis and low back. Keeping them flexible reduces strain on the lumbar spine. The ankle motion also adds a gentle nerve stretch, which is helpful for anyone with numbness or tightness down the back of the leg.
How Often Should You Do This Full Body Stretching Routine?
Once a day is a good starting point. This routine is gentle enough to repeat multiple times a day if your body feels ready. Consistency matters more than intensity.
A few things to watch for as you build the habit:
- If you notice increased swelling after any stretch, back off and speak with your CLT.
- If a stretch produces sharp pain rather than a gentle pull, stop and modify or skip it.
- Soreness 24 to 48 hours later is normal as your body adapts. Persistent pain is not.
For people managing active lymphedema, movement is part of treatment, not something to avoid. If you want a more structured lymphedema-specific program, my Lower Body Lymphedema Program walks you through everything step by step.
Frequently Asked Questions About Stretching, Lymphedema, and Recovery
Is it safe to stretch with lymphedema?
Yes. Gentle stretching is generally safe and beneficial for lymphedema. Movement helps pump lymph fluid through the vessels. The key is to start slowly and avoid overstretching. If you have active lymphedema, wear your compression garment during activity unless your CLT has told you otherwise. If you notice increased swelling after exercising, speak with your therapist before continuing.
Can I do floor stretches after breast cancer surgery?
It depends on where you are in recovery. Many floor stretches are appropriate within the first few weeks, but the range of motion you should use for the arm and shoulder changes depending on your surgery type and how healing is progressing. Your surgeon and physical therapist can give you the most accurate guidance. This routine is designed to be gentle, but always follow your provider’s specific instructions first.
How long should I hold each stretch?
This routine holds each stretch for 20 seconds. That is generally enough to begin feeling a release in the tissue. Some people work up to 30 to 60 seconds per stretch over time. At a light to moderate intensity, stretching for 20 to 30 seconds is safe to repeat daily.
What if I can’t get down on the floor?
A seated version of this routine is coming soon on my channel. Subscribe to get notified. In the meantime, many of these stretches can be adapted to a chair or bed surface. A physical therapist specializing in oncology rehab can help you adapt movements to your current level.
Can stretching help with fatigue from cancer treatment?
It can. Research on exercise in cancer survivors consistently shows improvements in fatigue, mood, and quality of life with regular low-intensity movement. Stretching is one of the gentlest entry points. Cancer-related fatigue management involves more than movement, but consistent gentle activity does contribute to how you feel day to day.
Getting Started With Gentle Movement After Cancer Treatment
Ten minutes on the floor is a small commitment. Over time, it adds up.
This routine works best when you treat it like any other part of your day rather than something you do when you feel up to it. Start with what you can. If you make it through three stretches, that counts.
If you want a more guided approach to cancer recovery, my Breast Cancer Rehab Program walks through movement, lymphedema management, and recovery in a structured, self-paced format.
I hope that helps.
Please speak with your doctor or CLT regarding any medical concerns, as this is not personalized treatment, but rather general education.